How To Make A Secret Bookcase Door to Hide A Safe Room
With the right plans, materials, and equipment, you can construct a Hidden Door to a Safe Room as shown here.
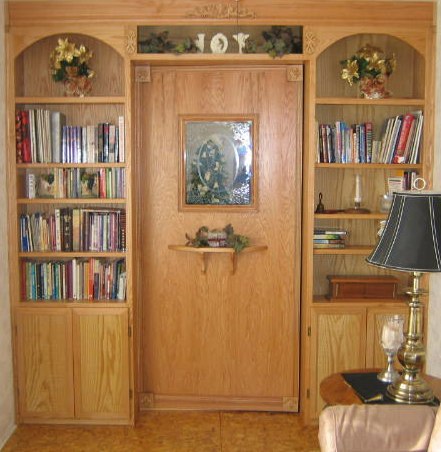
Materials:
- Must begin with a closet opening to a closet or Secret Safe Room
- Build a Built-in Wall Bookcase with a door opening; Book Case Plan
 click here to see a free plan for a wall book shelf plan
- 3/4" Oak (or other hardwood) Plywood @ 4' x 8': One Piece for the door panel
- 1 1/2" Decorative, Oak (hardwood) Molding Trim, 24'
- Four, 3 1/2" Square, Decorative Trim Blocks for the trimming of the Secret Door Panel

- Length of 3/4" metal water pipe cut to the height of the opening plus two inches
- 3/4" Round Pipe Collar
- 3" Lazy Susan Hardware

- One, Magnetic Cabinet Door Latch and/or Heavy-duty Lock Hardware
- Wood Screws; 1/4 lb. each: 1 1/4", 1 5/8", 2"
- Kreg Screws; 1/4 lb.

- 40 Shelf Pins Shelf Pins
- Eight Hinges Hinges

- Sandpaper
- Wood Filler
- Satin Finish Polyurethane Poly

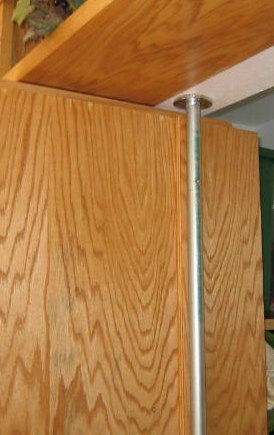
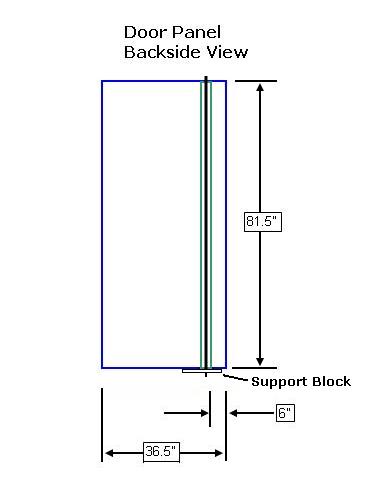
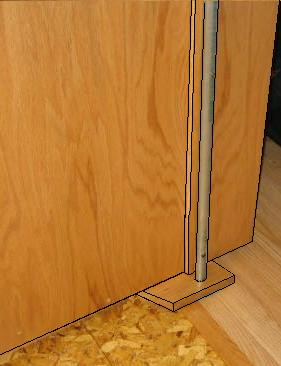
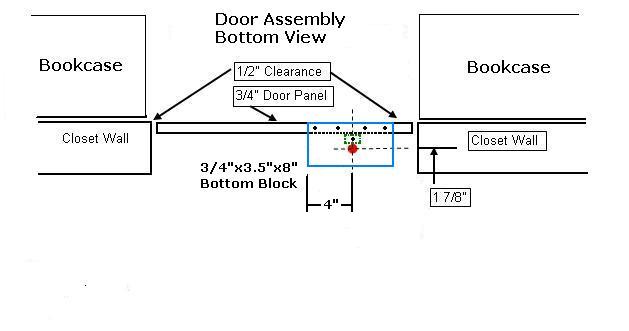
Step 1: Make the Door Panel - Measure the size of the door opening and subtract one inch from the top edge, subtract one inch from the bottom edge; subtract one-half inch from each side
- Rip and crosscut the plywood door panel to the desired size; save the waste
- Select the plywood waste and cut a piece 2" x the length of the door panel for the door extension/brace
- Select the 2" Brace; using glue and 1 1/4" screws (counter sink the screws) attach the Brace to the back side of the door panel, 6" from the pivot edge, as shown above
- Select a piece of 3/4" plywood scrap and cut a Bottom Support Block to 4"x8"; drill a 7/8" hole in it, as shown above; attach this Support Block to the bottom of the door panel with glue and 2" screws, as shown above
- Select the 3/4" pipe, drill five, evenly spaced holes (begin at least 3" in from each end) in a straight line (use a string or tape to ensure the holes are drilled in a straight line) to accept the 2" screws
- Select the pipe and attach it with the 2" screws to the Brace of the door panel (leave 1/2" length of pipe extending beyond the Bottom Support Block)

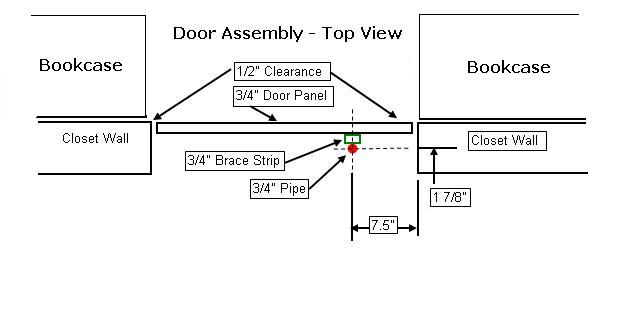
Step 2: Placement of the Door Panel - Identify the placement of the floor and top holes to receive the 3/4" Pipe
- Use the measurements in the above diagram to locate the center of the two, 7/8" holes to be drilled (one hole at the top, and one in the floor; Both holes must be in perfect allignment)
- Using a 7/8" drill bit (1/8" larger that the 3/4" pipe), drill a hole 1/4" deep into the floor; drill a hole into the top plate/header of the door at least 2" deep
- Select 3" Lazy Susan hardware; center it on the pipe and connect it with the supplied short screws to the Bottom Support Block
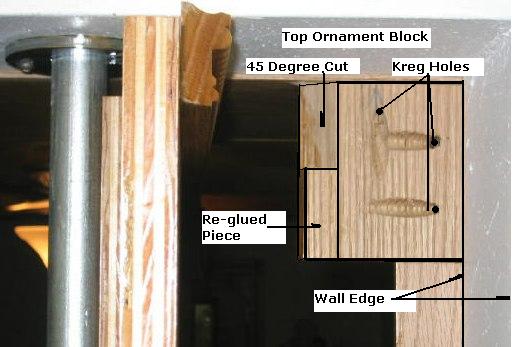
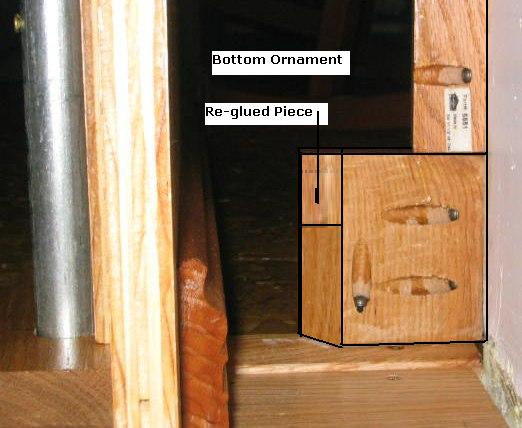
Step 3: Attach the Door Panel Trim to The Wall - Select the 1 1/2" Oak Trim material; and select the four, Corner Ornaments
- Select two of the Corner Ornaments for the Pivot Side; using a Kreg System
 , on the reverse side, drill three Kreg holes in each, as shown above
- Select the two Ornaments; opposite the side with the two holes, cut a 45 degree angle at the edge; save the cut away triangular pieces
- Select the two, saved triangular pieces, cut away 1 5/8" (to receive the 1 1/2" trim); reglue the remaining pieces to the top ornament (glue piece to bottom edge) and bottom ornament (glue piece to top edge); this procedure will hide the break in the molding that is required to open and close the door, as shown above
- Using Kregg Screws, attach one corner ornament on the top and one on the bottom of the pivot side, as shown above
- Measure the distance between the two decorative blocks on the pivot side; select the 1 1/2" Decorative Trim; cut the trim to fit between the blocks; drill the Kreg holes every 12"; using Kreg screws, attach the Trim to the back edge of the Bookcase (at the point where the back of the bookcase makes contact with the wall), as shown above
- Lift the door assembly into place (Top pipe goes into the top hole first); the bottom end of the pipe should drop into the bottom hole (the Door Assembly should rotate on the Lazy Susan, the end of the pipe should not touch the bottom of the hole); secure the lazy susan plate to the floor
- Select the 3/4" pipe collar and secure it around the pipe into the top of the door frame

Step 4: Attach the Door Panel Trim to The Door - Select the 1 1/2" Oak Trim material; and select the two, Corner Ornaments
- Select the Corner Ornaments and attach them to the Door Panel in the upper and lower corners (The Ornaments will extend beyond the Door Panel; use 1 1/4" screws and pre-drill the holes from the rear side); ensure the Ornaments are close, but not touching any other surface (use a piece of cardboard to measure the spacing); ensure that the door swings freely without scraping the Top Bridge of the Bookcase or the Floor, as shown above
- Measure the distance between the two decorative blocks on the top and bottom of the Door Panel; Select the 1 1/2" Decorative Trim; cut the trim to fit between the blocks; allign the outer edge of the trim with the outer edges of th Top and Bottom Blocks; with 1 1/4" screws, attach the trim from the rear side (pre-drill all holes)
- Measure the distance between the two decorative blocks on the top edge; Select the 1 1/2" Decorative Trim; cut the trim to fit between the blocks; the Pivot Side will be cut at 45 degrees; the opposite edge of the Door Panel side will be a butt joint, as shown above
- Measure the distance between the two decorative blocks on the bottom edge; Select the 1 1/2" Decorative Trim (or use the existing floor molding used in the room); cut the trim to fit between the blocks; the Pivot Side will be cut at 45 degrees; the opposite side will be a butt joint, as shown above
- Add a mirror and a shelf to the front of the Door Panel, as shown above
- Select a door magnet to hold the Door Panel closed; Option: Select a heavy-duty secure dead-bolt lock that can be locked from the inside of the Safe Room
- Complete all final sanding and apply a minimum of three coats of polyurethane

If you are a member of a non-profit organization and have any requests or suggestions regarding projects for your group, you can send Rod an email at: rodneyg@cheqnet.net


