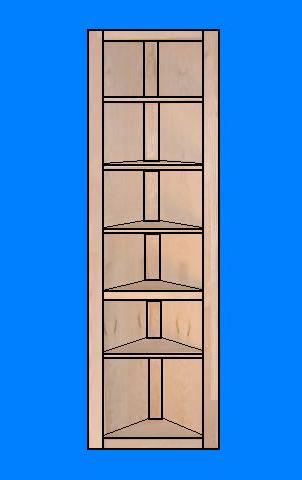
Materials
- 3/4" x 8" x 8' Oak Material: One Piece for the Front Corner Posts, Rails, and Shelf Fronts
- 1" x 3" x 8' Oak Material: One Piece for the Rear Post
- 3/4" x 4' x 8' Oak Plywood Panel: One piece for the Shelves
- 1/8" x 4' x 8' Oak Plywood Panel: One piece for the two, Back Panels
- Kreg Screws; 1/4 lb.

- 1" Wood Screws; 1/4 lb.
- Twelve, 1/4" Shelf Pins
- Sandpaper
- Wood Filler and Glue
- Satin Finish Polyurethane Poly

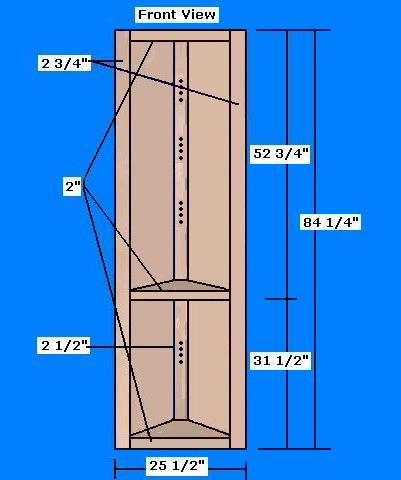
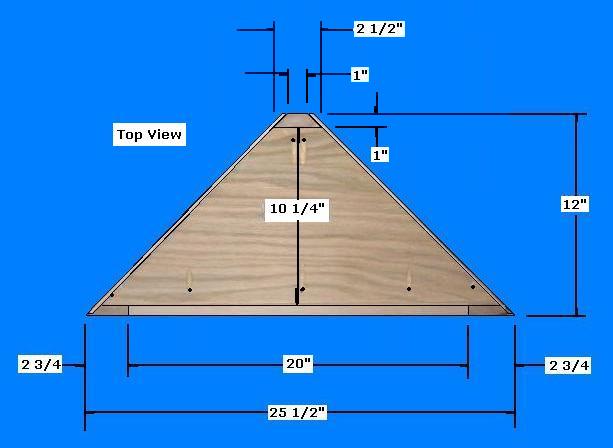
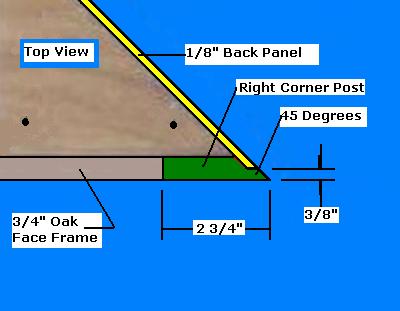
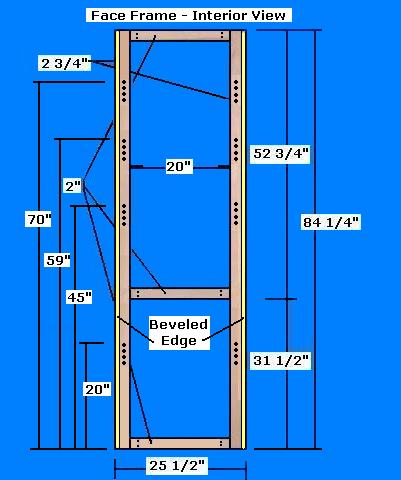
Step 1: Cut the Three Corner Posts, Three Rails, the Top/Bottom Panels, and the one, Permanent Shelf - Determine the desired size of the Corner Shelving Unit
- Select the 3/4" x 8" x 8' Oak Material; Rip two pieces (two Front Posts) to 2 3/4"; crosscut them to 84 1/4"
- Select the 1" x 3" x 8' Oak Material; Rip it to 2 1/2"; crosscut it to 84 1/4"; with a table saw, cut a 45 degree angle on each edge, for the Rear Post as shown above; drill the Shelf 1/4" Pin Holes with 1" spacing, deep enough to receive the shelf pins per the dimensions above
- Select the Left and Right Post; with a table saw, cut the two exterior edges to a 45 degree; make a 3/16" rabbit cut to receive the 1/8" Back Panels, as shown above; drill the 1/4" Shelf Pin Holes per the dimensions above
- Select 3/4" Plywood; cut three pieces for the Top and Bottom Panels and the one, Permanent Shelf per the dimensions listed above; drill the Kreg holes to receive the Front Frame and the Rear Post
- Select the 3/4" x 8" x 8' Oak Material; Rip one piece to 2"; crosscut it to three pieces @ 20" for the Three Rails

Step 2: Assemble the Front Frame - Select the two Front Corner Posts and the three Rails
- Use the Kreg Pocket Hole Jig System
 ; drill two holes on both ends of each Rail ; drill two holes on both ends of each Rail
- Select the two Side Posts; attach the Rails to the Posts with Kreg screws per the dimensions above
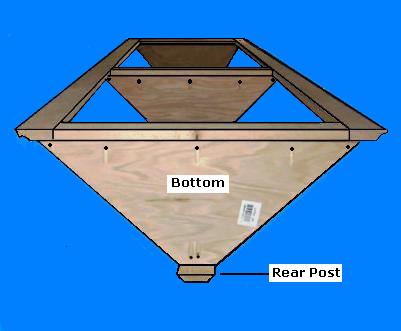
Step 3: Assemble the Shelf Frame - Select the Rear Post, Front Frame Assembly, the Top/Bottom Panel and Permanent Shelf
- Using Kreg screws, attach the three, 3/4" triangular plywood panels to the Front Frame, use the three Face Frame Rail Edges as a guide for the placement of the triangular pieces, as shown above
- Using Kreg screws, attach the Rear post to the rear of the three triangular plywood panels (Note: All Posts must be alligned perfectly to stand flat on the floor)
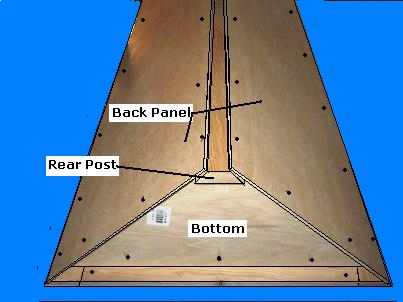
Step 4: Make and Attach the Back Panels - Select the 1/8" x 4' x 8' Plywood Panel
- Rip two pieces @ 16 1/2"
- Crosscut the two pieces to 84"
- Select the two panels; using glue and screws/brads, attach the Back Panels, as shown above
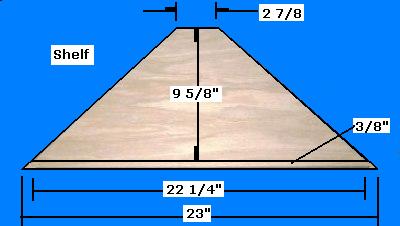
Step 5: Make the Shelves - Select the 3/4" x 4' x 8' Plywood Panel and the 3/4" Oak Material
- Select the 3/4" Plywood; cut four, rectangle Shelf Pieces @ 23" x 9 5/8"
- Select the 3/4" Oak Material; rip and crosscut four pieces @ 3/8" x 23"; these pieces will be the front edge of the Shelves
- Using glue and clamps, attach the four edging pieces to the plywood/shelf fronts
- Select the four shelving rectangle pieces; using a miter saw, make the 45 degree cuts as shown above
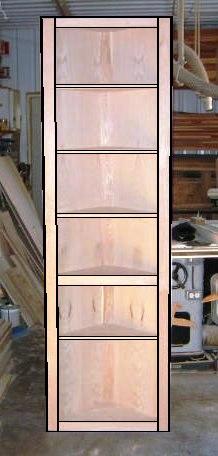
Step 6: Finish the Corner Shelving Unit - Select the Finishing Materials
- Use Wood Filler for all holes and gaps
- Complete all sanding
- Apply a minimum of three coats of poly


Copyright 2013 - Wayne Murray
If you are a member of a non-profit organization and have any requests or suggestions regarding projects for your group, you can send Rod an email at: rodneyg@cheqnet.net
|

